Using Islamic Geometry for Student Buy-In
Written by: Dr. Christine von Renesse and Dr. Philip DeOrsey.
In this blog we describe an activity that is especially helpful in getting student buy-in. You can read our blog about student resistance and student buy-in to learn more about models and research on this topic.

When we run the Islamic Geometry activities in our classroom, the activities usually span two to three weeks, or 7-8 hours of instructional time. The timeline of the activities generally begins with students working on ruler and compass constructions, with physical tools; ruler, compass, and pencil before moving on to digital designs. They also generally work on known designs first, before moving on to their own creations. By working on known designs we are able to give them early some early success that empowers them to persist later in the activity. These pathways allow students to experience the difficulty of creating artworks by hand, promoting a better appreciation for the art. Working on known designs allows them to experience different techniques for creation, which they can expand upon in their own designs.
To introduce Islamic Geometry and motivate the students, Prof. von Renesse assigned artwork from the youtube channel (see below) to groups of students. Their task was to research where this piece of art (usually part of a building) is located in the world, when and by whom it was built and anything else that was interesting to them. They then presented their findings to the class in a short presentation. It was empowering, especially for the non-white students, to see that these pieces of art were created in other cultures - often a long time before mathematics was done in the western world.
For the students first design experiences they were given the basic tools, ruler, compass, and pencil, and then were instructed to play around for a few minutes to get used to using the tools. We gave the students rulers but they are not allowed to use the measurement aspect of the ruler, it should only be used as a straight edge. As the instructor you should not be surprised if students do not know how to use these tools, and be patient in helping them. We have found that it is common that students have never used a compass before (or don’t remember using it) and it will take some time for them to understand the intricacies of its use. After students are comfortable using the tools, the first assignment for them is to construct a square using only a ruler and compass. We think you will find that this activity is challenging for students, and many of them will want to use the ruler to measure the side of the square and draw and approximate the square using the ruler. However, we have found that asking students questions about their construction and its accuracy, as well as giving them some hints about the use of all the tools they have, will help them in creating a correct construction. The construction of the square will in fact have several solutions, and different approaches allow for a rich classroom discussion. This could be your students’ first experience in seeing multiple correct solutions to a mathematical problem and we encourage the instructors to emphasize this as it will promote the students’ creativity later on in the activity.
Following the construction of the square we emphasize the particular construction that is used by Eric Broug in his book (references below), shown in the following image.

This construction provides the underlying grid that will be important for students to use in future constructions. Generally, Islamic geometric designs are highlights of particular pieces of the underlying grid and emphasizing that early on will help students recognize various designs later. Two designs that we like to use for square constructions are The Great Mosque of Cordoba [Broug page 27] and Cappella Palatina [Broug page 41]. These designs are easy to construct and give students a sense of accomplishment which is needed early in this activity. When constructing these designs students will follow along with instructional guides found in [Broug] or if you are interested in an interactive guide, you can use this excellent powerpoint by Grandi. We suggest giving students a square template to design on as this will produce images that are all the same size. We encourage students to personalize their designs by coloring them which leads into the first opportunity for students to share their work with the group, and start developing a sense of pride and ownership of their own materials.


When students are finished with their first design, either The Great Mosque of Cordoba, or Cappella Palatina, we have the students cut out their designs and physically tile the walls, or chalkboard in the classroom. When all of the students are finished with their design we ask them to predict what will happen when the tiles come together. What new shapes will they see? how will the tiling be different from a single tile? How can the tiling be more than just the sum of its parts? This is an excellent opportunity to use Think-Pair-Share, as students will see different elements of the design. Once they have had an opportunity to think about the tiling, we have them place their tiles and observe the final tiling. This showcases a community effort, coming together to create a large design in which everyone contributes.

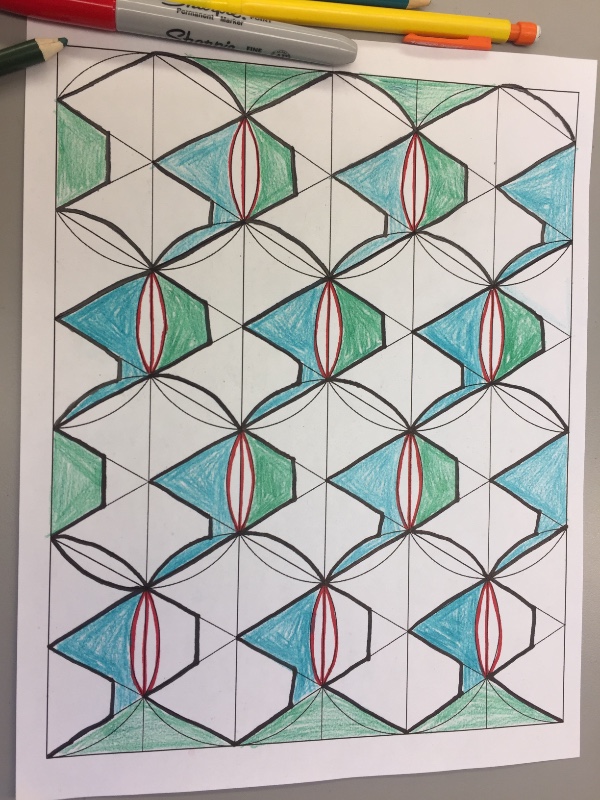
After students see how we can create a tiling from a given tile, and how we can create additional designs at the corners and edges, they were instructed to create their own tiling. We provided students with a 3x3 square grid, and asked them to create one tile, and then copy it onto the eight other tiles. This was the students’ first opportunity to create their own designs (see image), and develop their sense of ownership and individualism through their creations. This is an opportunity for students to differentiate based on the comfort and ability. We encourage facilitators to challenge advanced students here to keep them at their learning edge.
After students had the opportunity to create their own tilings by hand, we introduced them to various computer technologies, either Desmos geometry tool, or Geogebra geometry tool, to create their designs digitally. Based on student feedback we think that either of these tools will be good to help students increase their precision of design, and improve the quality of their artwork instead of taking years to master their physical use of the ruler and compass. The students in our classes were excited by the possibilities that the technologies opened up for them, especially after struggling with the use of the physical tools.
However, the use of technology did not come without its challenges. There is a level of precision necessary for students to effectively use these tools. Those familiar with Geogebra will know that certain tools require you to click on objects in a specified order, and getting used to this will take some time for various students. All our students were all able to overcome these difficulties and greatly preferred using the computer over the physical tools. If you trust your students, and believe that they can master these tools, they will be able to. We suggest that the instructor begins by showing students how to create an account, save their work, and open their previous work. This may seem like it is unnecessary but in our experiences these have been the places where students have found the most difficulty. It seems like many students are using programs that have an autosave feature, whereas the Desmos and Geogebra geometry tools do not, and students have to be reminded of this.

Continuing from our experiences using physical tools, the first task we give students on the computer is to create a hexagon using only the ruler and compass tools. Given their experiences with their previous designs, and creation of a square, this is something that usually comes quickly and results in an early success. This is important as students can become easily frustrated, and feeling good early will help persistence when the technology requires more precision. After creating and sharing their hexagonal constructions we make note of the hexagonal grid, shown left, that is integral to the creation of all hexagonal tilings.
After seeing this underlying grid students are often able to find it in some of the designs that we have seen from around the world. We go back and explore some designs created from hexagonal and square tilings and identify the underlying grids that we see using again the powerpoint by Grandi or Mian's youtube channel. This gives students a sense of how these artworks can be mathematical, and gives them a better appreciation for what they are seeing. Instead of just a pretty design they are now able to see the underlying structures in the artwork and view it mathematically. Having this new insight motivates them to create their own work.
https://www.youtube.com/watch?v=tr7CJz073-0&list=+PLHG5uxhiqH9WAEElqs6Bz...
In some cases the students were ready to create their own artwork at this point. If the students need more practice using the software, or working through hexagonal designs, we suggest using one of the hexagonal designs from [Broug] either Mustansiriya Madrasa or Esrefoglu Mosque. We have found that students were able to work through these successfully and gave them more confidence to venture out and do their own work.


After completing some known designs we had students begin creating their own artwork. We found it helpful to give students clear rules for what constitutes a valid design and one that does not. We wanted students to create a design using only a ruler and compass, and for the designs to be precise, specifically with all of the points on the lines. The simplest way that we found in accomplishing these goals was to tell students that they were only allowed to use two “free points”. A free point is one that can be moved and dragged around, which will result in a change in the design. This restriction ensures that students are actually using valid ruler and compass techniques rather than “faking” their constructions or using more sophisticated tools. We suggest stating which tools students are allowed to use up front, and these restrictions should be entirely up to the instructor. When students start their artwork we suggest that they pick either a square or hexagonal tile, and create a design inside of that. When they have their tile finished we showed them how to use transformations to copy their design into a tiling. We suggested to repeat the tile about 3-4 times so students could see the additional patterns that are created when tiles came together. Some students will choose to do more than this, but we offer a word of caution when copying your tiles. We have found that the size of the files grows quickly when copying and it is not uncommon to have the computer not be able to handle your design. So proceed with caution and don’t create more tiles than you want.
Exhibiting student work
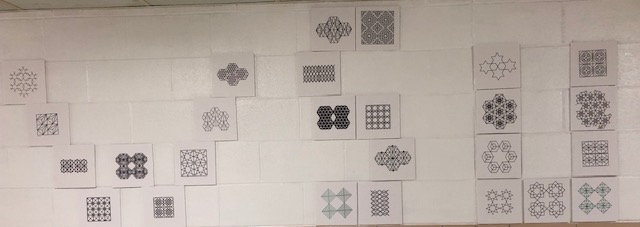
Once students have finished their designs we created a way for students to show off their work. Too often in our classes we have students turn in their work and we, the facilitators, are the only ones that get to enjoy the students’ creations. We have observed that this removes a motivating element for students: that their work will be seen by others. We sought to enhance student motivation by giving them the opportunity to share their work with the community, not only locally through campus displays, but also globally through the use of the internet and social media. The authors primarily used two methods for presenting work; plotter prints and displays in the hallways around the classrooms, and digital books offered by Geogebra.
Using the plotter
The plotter was the primary method of presentation used by the first author. Prints were made using the AxiDraw V3 plotter and the software inkscape. Students were instructed to create their designs in Geogebra as it has the functionality to output images in a vector graphics format (.svg) that interacted well with the inkscape software. The prints were then made on ¼ inch 8” x 8” foam core with sharpie to then be mounted in the hallways adjacent to the classroom. See the images below.
One of the primary drawbacks of using the plotter was the time required to print each design. With all of the tools in place you can print each tile in about 10-15 minutes, which can become prohibitive for large class sizes. Because of this demand, some of the printing was done during class time, and during scheduled office hours. While it is possible for prints to be done using multiple colors we chose to limit students to one color in order to moderate the printing time and complexity.
We believe this method works well as it gives an immediate positive experience to the student. They are able to see their work move from the digital into the physical space with live ink. One could argue that the same is achieved with a standard desktop printer, but there is an excitement around the plotter that is not achieved with the standard printer. If you are unfamiliar with a plotter we recommend watching this video of one printing as they have a certain calming aesthetic:
The cadence of the machine along with the visual dance is very satisfying. This production marks the end of several weeks of struggle for the student, and you can see their pride wash over them as their designs are printed.
After the displays were created we took pictures and shared them via our social media outlets. As these designs were created using Geogebra many of them were picked up by the Geogebra social media which is followed globally. In the days that followed the post we were able to share the results with students so they could see the joy that their mathematical work brought to the world.
Creating the geogebra book

The primary method of presentation for the second author was an online Geogebra book. This book showcases the Geogebra files that the students created, including the designs in full color. Much of the feedback that we received from students was of the form “I want to color this!” and this Geogebra book was a solution to the desire for color. The students were amazed by the fact that millions of Geogebra users had now access to their “book” and it clearly increased their effort in producing a beautiful, finished piece of art. Compared to the printed material above, it doesn’t have the same visibility in our building though, and is less likely to reach other students at our university.
In both exhibition methods, students celebrated their achievement -- and the resulting positive energy was helpful for student buy-in during the following weeks.
We hope that you are interested in using some of our ideas presented in this paper. If you have any comments or questions, please contact us. We always enjoy thinking about, discussing and improving our teaching!
Student Feedback:
"Before this class, I never thought of myself as much of a mathematician.I hated math, I thought I was bad at it, and I was dreading taking this class. This class showed me that not all math is formulas and numbers. I found myself engaged in each activity and actually enjoying them. I was making mistakes and sharing them, which in turn helped my classmates and I come up with a solution.I felt more comfortable sharing my mistakes because it is crucial to my learning process.This class helped me realize that I do not need to be good at traditional mathematics in order to be a good mathematician."
In Professor von Renesses's class, a student also chose to write a poem as her project which clearly shows her appreciation for the Islamic Geometry Activity:
Dear Math
Here it is the class I’ve been dreading
I don’t know why we can’t get along
For as long as I can remember
I’ve always struggled with you
The fear that takes over me
My stomach feels like I’m permanently stuck
on an upside down roller coasterI can’t do this
Don’t call on me
Please let me not be called on
The constant worry of being humiliated
What if I make a fool of myself?I wish it were easier for me
Everything changed with this class
I was still confused at first
Words like explore, patterns, and rhythms
Had me in a world win
Dig deeper like Stanley and Hector
In the Desert at Camp Green Lake
Create your own pattern for 5, 10, and 15.
Can you figure out how many beats, claps, or rests
there are for these numbers?
0 and 1 what comes next?
The zeros and ones are all starting
to look the same
Ugh I keep repeating the same patterns!
Why do I even bother?Yes I finally did it!
I successfully completed the pattern
I feel like the slow tortoise who made it to the
finish line towards the end of the raceTake your time
Not everyone learns the same
Stay positive, and remain focused
Suddenly I no longer feel like the odd ball outMaybe you’re not so terrible after all
Thanks to you I’m being exposed to new ideas that I never
even thought about before
Reading and writing now being incorporated
into our assignments
This can’t be true?Learning about
breath taking buildings like the Alhambra Granada and
the Great Mosque of Damascus
They all make me feel like we went on a tour across the globeThe detail and extensive planning it must
have taken the master mind behind these buildings
I could look at the designs on each art piece for hours
Somehow our math class has transformed into an art gallery
Or better yet a MuseumThe funny part is I used to despise you
I would leave your papers stuffed in my backpack
I would ignore you for hours and wait until the
very last minute to complete you
I never stopped to think that you are everywhere
Many of the objects we have now are because of youI used to believe that the only time you came around was
when it was time to solve problems and remember formulasNow I know you are full of many surprises
I think it’s about time we put this rivalry to rest
I’m sorry I never took the time to get to know you
Math - maybe we can be friends after all

References:
Broug, E. 2008. Islamic geometric patterns. London: Thames & Hudson.
Broup, Eric. 2015. Ted-Ed Talk “The Complex Geometry of Islamic design” https://www.youtube.com/watch?v=pg1NpMmPv48. Accessed August 2019.
DeOrsey, P. Video about Plotting Islamic Art Project. https://www.youtube.com/watch?v=wFrSlYi4BBY&feature=youtu.be. Accessed August 2019.
Mian, S. Youtube Playlist “How to draw Islamic Geometry:” https://www.youtube.com/watch?v=tr7CJz073-0&list=PLHG5uxhiqH9WAEElqs6Bzu.... Accessed August 2019.